What lock-and-outpaint is
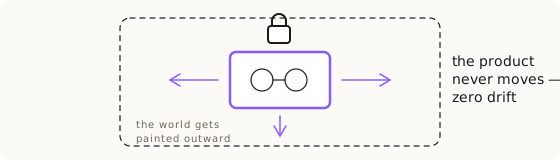
Lock-and-outpaint is the AI product photography technique where you keep the product image pixel-locked in its exact original position, crop, zoom and angle, and outpaint the environment around it instead of regenerating the product. You do not ask the model to redraw the product at all. You ask it to paint a new surface, a new background, a new world around a frozen product, and to blend only the light. The logic is one line: never redrawn = never wrong = zero drift. Every time an AI redraws a product, something can drift, a label, a proportion, a hinge. If the pixels are never touched, none of that can happen. This makes it the highest-accuracy route there is, and the one to reach for whenever the job is a product on a surface and the shot angle can stay fixed.
Why freezing beats regenerating
Here is the whole case for the technique. Every technique in product accuracy is a way of shrinking the delta between your source and your target until the model can clear it in one jump. Lock-and-outpaint does something different: it removes the product delta entirely. Zero product delta means zero product drift. The only thing you ask the model to do is invent the surroundings, which it is good at, and match the light, which it can be told to do. You never let it near the part that matters.
Contrast that with regeneration, where the model redraws the product itself. Regeneration is the right tool when you have to rotate the product, put it on a model, or bridge a pose the source doesn't have. But every re-render re-rolls the details. On hard products, one bad roll invents a defect a client will catch on sight. If the deliverable is the product sitting on a surface, and your source already shows the product from the angle you need, there is no reason to accept that risk. Freeze it.
The prompt skeleton
The prompt has three jobs: lock the product, describe the world, blend the light. Here is the skeleton I use, verbatim: "Keep the [product] [image1] in exact original position, crop, zoom, and angle. Do not regenerate, alter, or reprocess the [product] themselves. Outpaint the background on all sides into [surface/environment]. Match the existing lighting on the [product] to the new light direction."
Read as three clauses. The lock clause names the product and forbids the model from touching it: exact position, crop and angle, completely unchanged, do not regenerate. The outpaint clause describes the surface or environment you want painted around it, plus any camera repositioning the new frame needs. The integration clause is the one people skip and then wonder why the composite looks pasted: match lighting direction and color temperature to the locked product, and ask for realistic contact shadows where the product meets the surface. An optional fourth layer adds realism (vignette, grain, dynamic range) if the final needs it.
One frozen shot, a whole series
The payoff is leverage. From one locked studio shot you get a whole series: the same untouched product on wood, on silk, on concrete, on leather. On a February eyewear drop, one frozen packshot produced four finished surface shots, walnut burl, burgundy silk, weathered concrete and cognac leather, all from the identical skeleton: lock the glasses, outpaint the surface, match the lighting direction onto the new surface. Four deliverables, one source, and the glasses are pixel-identical across every one of them, because they were never redrawn.
That consistency is not a nice-to-have. When a client compares the four images side by side, the product reads as the same object in four places, which is exactly what a catalog needs. Try producing that series by regenerating four times and you get four subtly different products, and the client sees it immediately.
Lock, blueprint, or regenerate: the route logic
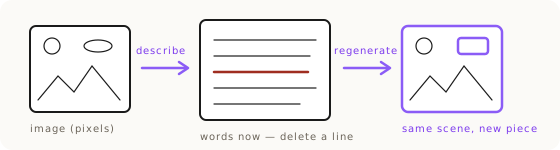
Lock-and-outpaint is one of two freezing techniques, and choosing between them and plain regeneration is the whole skill. Freezing in pixels is lock-and-outpaint: you keep the product's actual pixels and paint around them, ideal when the deliverable is a product on a surface at an angle the source already has. Freezing in words is blueprinting: you convert the whole image into an exhaustive text-to-image description, edit the words (delete the sentences describing the one thing you want to replace, keep every other sentence exactly), and regenerate to fill the hole. Blueprinting is what you use when a scene must be rebuilt around one replaced element, or when you need word-level control over a layout that only exists as pixels.
The rule of thumb: if the product is right and only the world needs to change, lock the pixels. If the world is right and one element inside it needs to change, lock the words. Reach for full regeneration only when the product itself has to move, rotate, or be worn, which is a job for pose-matching and the sequential pipeline, not for a single big prompt. The complete decision tree lives in the product accuracy route map.
The upstream unlock: angle coverage
Lock-and-outpaint has one hard requirement: the source angle must match the target composition. A three-quarter output needs a three-quarter source, because you are not letting the model re-pose anything. This is why the accuracy king is gated by angle coverage. The method is only as available as the angles you captured.
The fix is upstream, at capture time. If you have the physical product in hand, shoot an angle bank: at least ten angles around the 360 axis, once, in good light on a clean background. That capture buys years of production accuracy, because every future shot, in any composition, has its angle-matched source waiting. When language cannot fully describe a product (a complex hinge, an intricate mechanism), lock-and-outpaint becomes the accuracy method, and the angle bank is what keeps it always available. Miss the angle you need and you are back to synthesizing it, which is a different, riskier route. If the product is within reach of a camera, the stand-in route is the cheaper answer: shoot the missing angle yourself instead of asking the model to invent it.
Failure modes
Three ways this technique breaks. First, angle mismatch: you ask for a three-quarter scene from a front-facing source. The model cannot honor the lock and the angle at once, so it either ignores the angle or quietly re-poses the product, and now it is drifting. Match the angle before you lock, or capture the missing one first.
Second, the model redraws the product anyway. If your lock clause is weak, the compositor treats the product as suggestion, not constraint. Be explicit and repetitive: name the product, say do not regenerate, alter, or reprocess it, say completely unchanged. If it still redraws, the model itself may be the variable; try the same prompt on the next model.
Third, the composite looks pasted. This is a lighting integration failure, not a lock failure. The product carries its studio lighting into a scene lit differently, and the eye reads the seam instantly. Name the new light direction and color temperature explicitly, ask for contact shadows where product meets surface, and if it still floats, add the realism layer (vignette, grain, ambient bounce) to marry the two.
Key Takeaways.
- Lock-and-outpaint freezes the product's exact pixels and outpaints the environment around them: never redrawn = never wrong = zero drift.
- It is the highest-accuracy route when the deliverable is a product on a surface and the shot angle can stay fixed.
- The prompt has three clauses: lock the product (do not regenerate), outpaint the environment, and match lighting direction and color temperature.
- One frozen shot yields a whole consistent series: on one eyewear drop, four finished surfaces from a single locked packshot.
- Lock pixels when only the world changes, lock words (blueprinting) when one element inside the scene changes, regenerate only when the product must move.
- The technique is gated by angle coverage, so capture an angle bank of at least ten angles when you have the product in hand.
Ready to Put This Into Practice?
Dezygn gives you the AI creative tools, training, and community to turn these insights into real results for your clients.
Start FreeRelated Resources.
How to Get Product Accuracy with Nano Banana
Product accuracy in AI product photography is a discipline: name the defect, diagnose it, route it to the right technique, judge the output. Measured, not luck.
Read guideControl vs Variant: The Scientific Method for AI Product Images
How to fix an almost-working AI image without breaking it: lock a control, test one change per variant, and keep only the winners. Prompt-as-version-control.
Read guideThe Product Accuracy Route Map: Diagnosis to Technique
How do you fix an inaccurate AI product image? Name the defect on one of 8 fidelity axes, then route to the exact technique that clears it. The full map.
Read guide