What pose-match is
Pose-match is the AI route for creating a product reference that doesn't exist yet. When the product must appear differently than your photo shows it (a different angle, worn on a face, opened, folded, stacked), you transform the ingredient first, one small step at a time, instead of asking a single generation to do everything at once. Reach for it when photos are all you have and you can't reshoot: the AI builds the missing angle or pose, you approve it, and it becomes the reference the next step works from. It is one of three ways to create a missing reference, alongside the stand-in (the camera route) and the sketch (the drawn route). Pose-match is the one you use when the only thing in your hands is flat product photography. Once approved, the new angle can become the clean source for a hero shot the original photography could not support.
The reason this matters is narrow and specific: most accuracy errors happen when the model must rotate a product it has only seen from one side. It invents the hidden side, and it invents it wrong. Pose-match removes the rotation from the hard generation by doing it as its own approved step, so the compositor never has to guess a face of the product it was never shown.
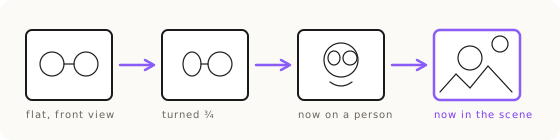
The worked example: glasses shot head-on, needed on a model outdoors
Say you have a pair of glasses photographed straight-on, and the brief wants them on a man outdoors at sunset. That is a rotation, a fitting, and a scene, all stacked. Pull the rotation out first. Step one, transform just the photo: "show these glasses in three-quarter view" (same background, same aspect ratio, only the rotation). Check it. Step two, that output becomes the reference: "a man wearing these glasses, close-up." Check the fit. Step three, "editorial photo of this man outdoors at sunset." By this point you don't even mention the glasses anymore, because the glasses are already correct in the source image you're feeding.
That is the whole idea of the technique in one line: three small deltas instead of one impossible one. Every step shrinks the gap the model has to clear until it can clear it. This is the same principle as the pillar guide's core rule, never ask the generator to bridge a big delta in one step. Pose-match is that rule applied specifically to angle and pose.
Angle-matching is the core
The heart of pose-match is matching the reference angle to the output angle. Front pose gets a front-view reference; three-quarter pose gets a three-quarter reference. When the reference and the target differ by a rotation, don't make the compositor carry it. Transform the ingredient in isolation first, get that single angle right, then place it. If the angle you need simply doesn't exist in any photo you have, this is where you create it, get it approved, and use it.
Creating a missing angle is also the exact case where a small transformation step is worth doing. A single generation cannot place a product at an angle it has never seen without inventing the hidden geometry. Making that one angle as its own approved reference is not the compositor's job to improvise; it is source preparation, done up front, once.
The eval that flipped the doctrine: one jump beats the chain
Pose-match started life as a chaining habit: transform, then transform again, then again, small step after small step. We measured it, and the result corrected the doctrine. On a sharp three-quarter packshot (a tortoiseshell frame with legible temple text, upscaled, rendered at 4K), across 48 generations and 36 blind verdicts, one jump beat chaining decisively: a best-of-3 chain pass of 100% for one-jump versus 25% for the two-step and three-step routes, with roughly 0.7 defects per image for one jump against 2.8 for two-step and 2.3 for three-step. Defects tripled going from one step to two.
The mechanism is simple once you see the numbers: every extra chain step re-renders the product, and each re-render accumulates identity drift. So the house rule, now deployed inside Dezygn's assistant Awa, is: sharpest possible reference, one jump, three variations. That verdict is scoped to this one test, a single product with a sharp reference and a single placement, not a ruling that chaining is lesser. Chaining is the peer technique for when the job needs control a single edit cannot hold, such as an angle that has to be created first, a multi-product composition, or a consistent model held across a series. In the glasses example above, the surviving chain step is step one alone (creating the three-quarter angle); once you hold that sharp angle, the trip to the final scene should be one jump, not two more.
The sharp-reference prerequisite
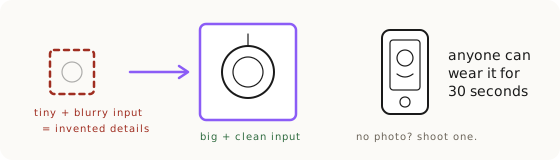
None of this works without a sharp reference, and we learned that the hard way in the same eval. The first round scored 0 out of 12 on strict fidelity across every route, with no difference between arms. The bug was the reference: the packshots had blurry temples. The model could never reproduce, and the judge unfairly penalized, details the input never showed. It was a live confirmation of the rule that governs all of this: the AI can't keep details it can't see. Round one is a methodology lesson, not doctrine, so ignore its numbers.
When the reference was made sharp, the same task went from 0% strict fidelity with the blurry-temple reference to 75% with a sharp one, one-jump. That single change is the biggest accuracy lever we have measured to date. It is why pose-match is downstream of clean reference: before you ever pose-match, the ingredient has to be at least 1,000px on the long edge (ideally 2,000px), background stripped, cropped to your output aspect ratio, with the small details sharp and large in frame. If it's blurry to you, it'll be worse in the output. The input, not the method, is usually the bottleneck.
Pose-match vs stand-in vs sketch: pick by what you're holding
Pose-match is one of three siblings in the "create the missing reference" family, and the choice between them is decided by what is physically in front of you. Only have photos, no product in hand and no reshoot possible? Pose-match, the AI route: have the model build the missing angle. Holding the physical product? Stand-in, the camera route: photograph anyone (yourself, a friend) wearing, holding, or arranging the product and use that shot purely as a fit and pose reference, while identity comes from elsewhere. Have neither, and words can't carry the position you need? Sketch, the drawn route: a rough doodle of the placement.
The trade-off is truth versus availability. The stand-in has higher truth (a real photograph of the real product in the real pose) but it needs someone to actually hold the physical product, which in the common freelancer case is nobody. Pose-match needs no physical product at all, only a clean photo, which is why it's the route you fall back to when a stand-in shot is one nobody can take. When even that fails, the route map points back to the bluntest recovery move of all: no usable photo at all? Take one.
Pose-match vs lock-and-outpaint: move the product or freeze it
There is a second route that solves the opposite problem, and knowing which one you're in saves hours. Pose-match moves the product to fit the shot: you re-pose or re-angle the ingredient, then place it. Lock-and-outpaint does the inverse: it freezes the product's exact pixels and builds the world around them. Inside Awa these are the two modes of the same skill, and the deciding question is whether the pose in your reference is already the pose you want.
If the angle you have is already right and you only need a new background or surface, don't pose-match at all: lock the product and outpaint. Zero product delta means zero product drift, which is the highest-accuracy route there is when the deliverable is a product on a surface. Pose-match earns its keep only when the pose itself has to change. Reaching for pose-match when lock-and-outpaint would do is exactly the kind of extra re-render the eval punished.
Create the angle once, then save it forever
When you create a missing angle, don't throw it away after one shot. A product captured from every key angle is a permanent asset. Get the angle generated, get it approved by whoever knows the product best, and save it. The best version of this happens upstream, at capture, before any AI is involved: shoot the product from roughly ten angles around the 360-degree axis, an angle bank, so pose-match work is never required later. There is a huge amount of leverage at the capture stage.
Everything you build this way compounds. The sharp three-quarter reference you made for one campaign is the exact ingredient the next campaign's shot starts from. Angle-match once, and the second, third, and tenth use is free.
Key Takeaways.
- Pose-match is the AI route for creating a product reference that doesn't exist yet: an angle, a pose, a worn or folded state you have no photo of.
- Most accuracy errors come from the model rotating a product it has only seen from one side and inventing the hidden side wrong; pose-match pulls that rotation out as its own approved step.
- Measured across 48 generations: with a sharp reference, one jump beats chaining decisively (100% vs 25% best-of-3, ~0.7 vs 2.8 defects per image), because every extra step re-renders the product and accumulates drift.
- The house rule is sharpest possible reference, one jump, three variations; chain when the job needs control a single edit can't hold, like a created angle or a consistent model across a series.
- The reference must be sharp first: a blurry-temple reference scored 0% strict fidelity, a sharp one 75%, the biggest accuracy lever we've measured.
- Pick by what you're holding: photos only means pose-match (AI route), physical product means stand-in (camera route), neither means a sketch (drawn route). Then save the angle forever.
Ready to Put This Into Practice?
Dezygn gives you the AI creative tools, training, and community to turn these insights into real results for your clients.
Start FreeRelated Resources.
How to Get Product Accuracy with Nano Banana
Product accuracy in AI product photography is a discipline: name the defect, diagnose it, route it to the right technique, judge the output. Measured, not luck.
Read guideComp Cards: Consistent AI Models Across a Whole Catalog
What a comp card is in AI photography: a pose grid for choosing a model, plus the clean portrait you composite from to keep one face across a catalog.
Read guideThe Product Accuracy Route Map: Diagnosis to Technique
How do you fix an inaccurate AI product image? Name the defect on one of 8 fidelity axes, then route to the exact technique that clears it. The full map.
Read guide