What the route map is
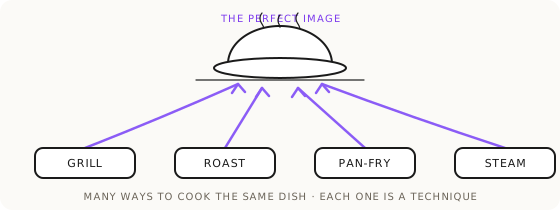
The Product Accuracy Route Map is the diagnosis-to-technique dispatch system behind the whole accuracy method. There are many ways to cook the same dish: several techniques reach the same accurate image, and choosing which one to use IS diagnosis. You taste first, name exactly what is wrong, and only then does the map hand you the method. The rule is short: diagnose, pick ONE technique, commit. Never technique-hop randomly, and when one way keeps failing, switch methods instead of forcing the same one harder. Use it whenever an AI product image comes out close but wrong and you cannot immediately tell which fix to reach for. It runs live inside Dezygn's AI creative director, Awa, as her route-map skill wired to a fidelity judge, and it sits on top of the full product accuracy method.
Diagnose before you route: the 8 fidelity axes
Before you pick a technique, you name the defect on one of eight fidelity axes. The axes are: silhouette and outline, proportions and scale, element count, text and typography, graphics and pattern, material and finish, color accuracy, and small construction details. These are the eight ways an AI product image can be untrue to the real thing, and they come straight from the T7 fidelity bench, the same judge (fidelityJudge.ts) that scores accuracy inside the app. The axes are fixed; the per-product features are extracted from the references. Diagnosis is not a vibe. It is picking the axis the image is failing on, because that axis is what decides the route.
This is the part beginners skip, and it is why they end up rewriting the whole prompt and rolling the dice again. You do not fix an image; you fix an axis. Wrong size is a proportions failure. A label that reads as gibberish is a text failure. A percale sheet that renders smooth and shiny is a material failure. Two illustrations where the client's product has three is an element-count failure. Name the axis in one sentence first, then the rest of this page tells you the move.
The dispatch table: which failure routes to which technique
When the ask is one small step from what you already have, take the simple route: one good prompt built with the Visual Syntax framework, or a template one-liner if a reference already carries the exact look. Most images that are close do not need a pipeline. They need one clean prompt in the right order. Escalate to the harder routes only when this one visibly fails.
When you know WHICH thing is wrong (this word, this descriptor, this one detail), lock a control image and change exactly one variable per variant, keeping the winner and folding it in. That is the control-versus-variant pipeline, and when you have isolated the single failing word you run micro-iterations: slight variations of that descriptor only, to force the odds. This is the workhorse route for a defect you can point to.
When the axis is proportions or scale, the product is coming out the wrong size, route to dimension control: a number for the human, a comparison to one clean anchor for the model, and a magnitude word only when the size is far from normal. When the axis is material and finish, the surface reads wrong, route to material fidelity: translate the client's in-house term into a craft the model was trained on, and forbid the failure mode by name. When the axis is element count, too many or too few parts, that is a count error with its own handling.
When the product needs an angle or pose your photo does not show, route to pose-match: create the angle you need before you place the product, then match the model's pose to that reference. When the deliverable is product-on-surface with pixel-perfect fidelity at a fixed angle, route to lock-and-outpaint: freeze the product's exact pixels and paint the world around them, which is the highest-accuracy route because zero product delta means zero product drift. When the scene is right but one element inside it has to be replaced, freeze it in words instead and route to blueprinting.
When details are mushy, the reference is bad, or nothing improves no matter what you change, the input is the problem, not the prompt: clean the reference, ask for a bigger output, then switch models, in that order. If there is no usable photo of the product at all, that is the stand-in problem. When you do not know what is wrong, or the full scene defeats every fix, run a Shannon Descent: descend to the smallest part, solve it in isolation, then rebuild upward. And when a person, a product, and a scene must all be right at once, run them as a sequence, one stage verified before the next, holding the model's identity constant with a comp card so the face does not drift between shots.
The one law under every route: never bridge a big delta in one step
Every route on the map is the same idea wearing different clothes: never ask the AI to make a big jump in one step. A jump, or delta, is the distance between what your inputs already show and what you are asking for. Big jumps fail in random ways, and every technique below turns one big jump into small checked steps. If your reference is a front-facing product and you want it on a model at the beach in three-quarter view, that is three transformations, not one. This is the whole reason the map exists: routing is just choosing how to cut one impossible delta into deltas the model can actually clear. The full argument for building a complex shot as a sequential pipeline is here.
The doctrine is measured, not just believed
This is the part nobody else publishes. We ran the routing logic through a controlled eval campaign: identical base prompts, one variable per arm, a blind Opus judge that never sees which arm it is scoring. The doctrine is now partly measured, not just believed, and the numbers sharpen the map.
Word order matters more than people think. Across 27 images testing the same winning clause in different positions, the critical constraint at the START of the prompt scored 0.026 error against 0.062 at the end and 0.078 in the middle: the same words are about 2.5 to 3 times more accurate at the start, and the middle is the worst position of all. The practical rule for every recipe is that the critical constraint is the very first sentence, then the scene.
Dimensions confirmed the split the map assumes. Across 126 images, stacking a number plus a comparison plus a magnitude word won at 0.112 mean error, while centimeters alone came last at 0.196. The reason is that the levers fail in opposite places: a number and a comparison are near-perfect at typical sizes but collapse (56% off on a palm-sized perfume bottle) on unusual ones, and magnitude words are the exact mirror. No single lever dominates, which is why dimension control stacks all three.
Materials fall into three prior classes, measured across 75 images. When the model's default idea of a material is correct (linen, tweed, waffle), naming it is enough and extra wording adds nothing. When the default is wrong (a white percale bed the model insists on rendering smooth), words cannot cross the prior, and piling on more words trended slightly worse. Only when the material is ambiguous (leather can be smooth or pebbled) do texture adjectives genuinely earn their keep. That is why material fidelity tells you to ask what the model already thinks, before you write a single texture word.
And the delta law itself got tested. On pose-match, a sharp three-quarter reference plus one jump plus three variations passed at 100% best-of-three, against 25% for a two-step chain, across 48 generations. Every extra chain step re-renders the product and accumulates identity drift; defects tripled from one step to two. Input sharpness, not the method, was the real bottleneck all along. The house rule that came out of it: sharpest possible reference, one jump, three variations. That verdict is scoped to one narrow case, a single product with a sharp reference and one placement; chaining is the peer technique for when the job needs control a single edit cannot hold, like a created angle or a multi-product build.
Escalation: pick one, commit, then switch, do not force
The map is not a menu you graze. You diagnose, pick one technique, and commit to it for a real run before you judge it. One generation is rarely perfect even with the right prompt, so plan 3 to 6 variations for easy tasks and up to about 10 for borderline or random ones. Beyond roughly 10 tries on the same prompt, the prompt is the problem, not the dice, and that is your signal to switch routes rather than force the same one harder.
Discards are the quality filter doing its job, not a failure of the prompt. A beginner burns about 10 generations per keeper; a prepared operator gets down to 2 or 3 per keeper. Preparation is what moves you down that curve, and the client only ever sees the flawless ones. Draft cheap while you are still choosing a direction, then finish expensive on the final: never one-shot at full price, and never ship at draft quality.
The terminus: Manual Handoff
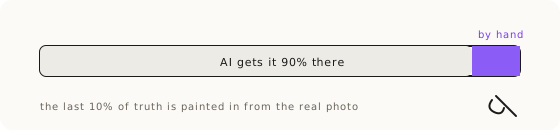
Every route on the map ends in the same place when the model truly cannot clear the delta: the Manual Handoff. Know when the machine is done. Saying the AI cannot do this part is a valuable output, not a defeat, because it saves hours. The sign of a true wall is specific: two full techniques exhausted, the same defect keeps returning, and each new try starts breaking OTHER parts of the image. The fix always has the same shape. AI builds the scene 90%, and the last 10% of truth is applied by hand from the real photo, whether that is transplanting a fabric's real folds, placing a series of illustrations that must match perfectly, or matching color from a brand PDF.
The handoff has two rules that keep it honest. First, it is a proposal with evidence: here are my attempts, here is the stubborn defect, here is the manual fix I recommend, never a silent giving-up. Second, write the manual recipe down clearly enough that a future tool could do it, because impossible shrinks every year. Inside Dezygn that manual finish is what the Atelier editing studio is for, and it is the terminus of the same accuracy method every route on this map serves.
Key Takeaways.
- Diagnose first, then route: name the defect on one of eight fidelity axes before you pick a technique.
- There are many ways to cook the same dish; choosing which technique reaches the accurate image IS diagnosis.
- Every route is one law in disguise: never ask the AI to bridge a big delta in one step.
- The routing is measured, not just believed: word order, dimensions, materials, and one-jump-versus-chaining were all tested against a blind judge.
- Pick one technique and commit; beyond about 10 tries on the same prompt, the prompt is the problem, so switch routes rather than force one harder.
- Every route ends at the Manual Handoff: AI builds 90%, the last 10% of truth is applied by hand, proposed with evidence and written down as a recipe.
Ready to Put This Into Practice?
Dezygn gives you the AI creative tools, training, and community to turn these insights into real results for your clients.
Start FreeRelated Resources.
How to Get Product Accuracy with Nano Banana
Product accuracy in AI product photography is a discipline: name the defect, diagnose it, route it to the right technique, judge the output. Measured, not luck.
Read guideSize Control: Why AI Doesn't Understand Centimeters
Write '5cm border' and get one four times bigger? AI learned from pictures, which carry no measurements. Steer size with magnitude words and clean anchors.
Read guideThe Prior Test: When the AI Knows Your Product's Material Better Than You
How do you get AI to render a material correctly? Run the prior test: find out what the model already believes it looks like, then decide if words can fix it.
Read guideLock-and-Outpaint: Zero Product Drift by Freezing the Pixels
Lock-and-outpaint freezes your product's exact pixels and paints the world around them, so it can never drift. When to use it, the prompt, the failure modes.
Read guide